
Doctor zCX
Or
How I Learned to Stop Worrying and Love Containers
Background
This is the story of one person’s experience with setting up the new zOS Container Extensions feature—a.k.a. “zCX”—under zOS 2.4, deploying a simple container into it, and getting it all to work. If the title of this piece seemed somewhat familiar when you read it, or if you perhaps further caught the implied reference to the 1964 black comedy starring Peter Sellers, entitled Dr Strangelove, then you’re probably old enough to already have a head start on understanding the challenges your humble author encountered during this endeavor.
You see, I’m old. How old? I’m “face down, nine-edge first” old. I’m “setting up the program drum on an IBM model 029 keypunch machine” old. I’m “stage1 stage2 SysGen for CICS V1.1.2 (two releases prior to the ‘new fangled’ CICS command level API)” old. I’m even “wiring the plug-board for an IBM 552 Interpreter machine” old. I don’t share any of that to boast. Quite the contrary, I mention it hoping that you, the reader, might understand how over the years I’ve had a lot of time to learn and become entrenched in “how things are done” (or at least used to be done) in my happy role as a Systems Programmer responsible for the care and feeding of IBM System Software, from good old DOS/VS R.34 up to and including the current zOS 2.4, and all over the rest of the map.
Old habits die hard. Sometimes they even try to take you with them.
I ask your indulgence for just a little while longer as I set the stage.
It took me some time and effort to begin to grasp the attraction of containers and container systems, including the currently popular Docker. Virtual machines (VMs) pose no such problem. Virtual machine hypervisors and their benefits have been around for a long time, now, and are well understood. Regarding containers, though, I struggled to understand how container architecture differed from a virtual machine, why it had become so popular, and why I should care. I’m still not sure I’ve grasped it all, but so far I think I get:
- A container provides the benefits of isolation and protection from “the outside world,” similar to that of a VM, without requiring the additional overhead and complexity of needing its own dedicated operating system instance.
- Because of the above, containers are smaller, lighter, and take fewer hardware resources to run because, through the interface of a container engine such as Docker, they all share the same instance of an underlying operating system.
- A container structure allows for the packaging of code along with the various files, configuration information, support libraries, and data as a unit that can be relatively easily deployed onto a container engine, such as Docker, with a minimal amount of work.
- A Container begins life as an Image. An Image is, for lack of a better way to put it, a bundle that consists of a set of code, data, libraries, configuration data, and so forth, that has all been packaged together in such a way that it can be deployed into a container engine. When an Image is deployed into a Container engine, perhaps along with additional layers of configuration as described above, it is provided access to other system resources such as external data and networking, and begins to execute them. At that point it becomes a Container. The same input Image can be used to deploy multiple Containers, each one having different configurations and customizations layered into them.
- The file structure of a container is such that its contents can be overridden and customized by adding additional supplemental layers that add to or supersede the contents of the original file structure without physically replacing or altering the originals. This property of containers allows, for instance, inserting specific directory structures from the “outside” (container host) into a container. One useful means of using this feature I’ve discovered is to use those outside directory structures to hold configuration information for the container. Doing so allows ‘refreshing’ the container from a newly updated and downloaded image file without losing or having to rebuild its configuration.
- The degree to which the contents and resources of a running Container are exposed to the outside world is controllable and can be changed.
zOS Container Extensions (zCX)
zCX is a software appliance introduced as part of zOS 2.4 which is intended to allow any Docker Container that can run on IBM zLinux to run on zOS right alongside the traditional zOS workload.
It requires hardware feature code 0104 installed on at least z14 level hardware. The associated software is part of zOS 2.4 and includes a Linux kernel, a Docker engine, and zOSMF workflows necessary for configuring and managing the appliance.
Preparing the Environment
zOSMF
This was my first hurdle. When configuring a zCX instance for zOS, thou shalt use zOSMF workflows.
There is no other option.
I like JCL. I’m familiar with JCL. I understand JCL. I’m not necessarily comfortable with having to work with an interface that takes JCL out of my capable hands and asks me to trust a layer of abstraction to do a job for me and get it right. I understand IBM’s desire to make the zOS world more appealing and familiar to those who will come along after me and perhaps are not as comfortable as I am with JCL, but I just wish that I’d been given an option.
There are certain requirements for zOSMF that must be in place before one can begin.
They are:
- The Common Events Adapter (CEA) component of zOS must be configured in “full function” mode. On the system I used for this journey, this involved:
- Making sure that the security user ID which the CEA started task runs under was enabled for Trusted mode. On RACF, the command was RALTER STARTED <userid> STDATA(TRUSTED(YES)) followed by a refresh of the started task list in RACF. For other SAF-compatible security systems, the process will likely be different.
- Restarting CEA (under SUB=MSTR) to pick up the above authorization if it wasn’t already present.
- zOSMF Notification Services must be configured.
- zOSMF Settings Services must be configured.
- zOS Jobs REST Services must be configured.
- zOS Dataset and File REST Services must be configured.
- TSO/E Address Space Services must be configured.
Accomplishing all of the above required some additional configuration of the security system—RACF, in my case—using jobs that were copied from SYS1.SAMPLIB and appropriately customized as needed. There is some documentation available in the zOS 2.4 Knowledge Center, at the time of this writing located at: https://www.ibm.com/docs/en/zos/2.4.0
I should also mention that I used the IBM Redbook, Getting started with z/OS Container Extensions and Docker SG24-8457-00, as a guide. Without this helpful publication I would have been even more lost. It’s available at: https://www.redbooks.ibm.com/abstracts/sg248457.html?Open
After zOSMF was configured and validated, it was time to make some decisions. The input to the zOSMF workflow which is used to provision a zCX instance can be provided in the form of a file on USS, or it can be provided interactively as the workflow steps are performed. I chose to use an input file. The provisioning process also created files on USS, some of which were stored in standard locations such as /global/zcx and its sub-directories. Other locations were user-configurable.
In my case, there was also some SMS configuration required. The provisioning process creates several VSAM linear datasets for use by the zCX instance. I got to choose their names, or at least their high level qualifiers, as well as the volume(s) and/or various SMS classes to be used for them. Getting that ready to go may require updating the various SMS ACS routines, as it did in my case. In terms of DASD space, for my zCX instance, in which I took all the default/minimum values for the various sizes, I found that one full and previously empty 3390–9 by itself was not enough space to fulfill the total DASD space requirement.
TCPIP configuration.
Each zCX instance requires a dedicated IP address of type ZCX defined in the TCPIP stack that it will connect to. For example:
VIPADYNAMIC
ENDVIPADYNAMIC
Provisioning Input File
Next on the hit parade was creating the input file for the provisioning workflow. IBM provided a sample file in /usr/lpp/zcx_zos/properties/workflow_variables.properties that could be copied to a location of my choice and modified. The Redbook I mentioned above had some good suggestions for changes, so I won’t repeat those here. However, there were some that weren’t mentioned, or at least bear some expansion:
Note: Creating an input properties file beforehand is not strictly required. You may, if you choose, enter all the values interactively as part of executing the provisioning workflow in zOSMF. One of the variables, ZCX_SAVE_PROPERTIES, specifies a location in USS where the collected values will be stored for later reference.
ZCX_DOCKER_ADMIN
This variable establishes the administrative user ID for working with the internal Docker engine and is used for various tasks, such as downloading images from hub.docker.com, deploying containers, starting and stopping containers, etc. The default setting is “admin.” There’s no real reason to change this value because it does not necessarily correlate to any real security system user ID. Using this ID to log on to the Docker instance requires generating a public/private key pair to use with ssh. Using a password to log in to the administrative interface is not supported. You must use a public/private key pair and only a public/private key pair associated with the ID you specify for ZCX_DOCKER_ADMIN. The public key value must be provided in variable ZCX_DOCKER_ADMIN_SSH_KEY (below) in the properties file that is input to the zOSMF workflow. Accessing the administrative interface requires you to provide the private key along with the ssh command, so securing the administrative ID is a matter of securing access to the file that contains the private key, and only that. Changing the administrative ID to something other than “admin” or leaving it unchanged has no real bearing on security, so why bother? During my first attempt at provisioning, I didn’t understand this and changed the ID to something else. As it turned out, it didn’t matter, because I was unable to successfully log in to the zCX instance anyway until I redid those settings. More on that to follow.
ZCX_DOCKER_ADMIN_SSH_KEY
This is the public key that the zCX instance will use to control access to the administrative interface. You generate a public/private key pair by using the following command from an OMVS shell (or accessing OMVS via an SSH session from a compatible client):
ssh-keygen
You will be prompted for names into which the generated public and private key files will be saved. The default location will be <your USS home directory>/.ssh/id_rsa but you can override it, if you desire. If you accept the defaults, two files will be generated for you:
<your USS home>/.ssh/id_rsa.pub
<your USS home>/.ssh/id_rsa
The id_rsa.pub file contains the public key value that you must copy into the input provisioning file and assign to ZCX_DOCKER_ADMIN_SSH_KEY (more on this later). The id_rsa file contains the private key and must be provided during logon to the administrative interface.
For the next prompt:
Enter passphrase (empty for no passphrase):
You can choose to leave it empty, or supply a passphrase which you will be prompted for any time you try to use the generated private key. Your choice.
This topic is one of the few areas where that Redbook was not so helpful. In section 4.2.6 Create SSH Keys, it goes to great lengths to talk about logging in to OMVS using the same ID as the one you’re assigning to ZCX_DOCKER_ADMIN (“admin” being the default) before you generate the keys. You don’t have to do this. It doesn’t matter which ID you’re logged in under when you run ssh-keygen! As I said previously, the only things that control access to the administrative interface are these two files with the public and private keys. As long as you know what the defined administrative ID is (“admin” in our case) the only other thing you need in order to be able to access the administrative interface is the private key file. It doesn’t matter which ID you’re logged in to OMVS under at the time. This particular aspect of the process—generating and using these key files and accessing the administrative ID—caused me a lot of grief. Probably, as I said at the beginning, this was because I’m old and not all that familiar with how these things are done in the Linux world. I think the Redbook could have been clearer about this.
Next, (yes, we’re still talking about ZCX_DOCKER_ADMIN_SSH_KEY) performing the step of copying the contents of the public key file (<your USS home>/.ssh/id_rsa.pub if you took the defaults during ssh-keygen) can also cause problems if you use the wrong mechanism for copying the key into your provisioning file or into the workflow dialog itself. The key value is quite lengthy, and some methods of copying it (attempting to use ISHELL/ISPF, for example) can, unbeknownst to you, insert carriage return characters into the key value. This will cause it not to work and will make the administrative interface impossible to access. The error messages you will receive in that situation are somewhat cryptic and don’t do much to help you ascertain what’s causing the problem. Personally, I found that editing the properties file and copying in the private key value was easiest to do via the text editor available in a Remote Systems connection in an iDZ session. Just make sure that you copy the whole key value, beginning with the text ‘ssh-rsa’ and ending with (and including) what resembles an email address, and put that into your provisioning input file. It doesn’t matter that the ID near the end of the generated key is probably not “admin.” It will still work fine.
I’ll cover how to actually use the private key to access the zCX administrative interface later. This is another area that I struggled with due to my own lack of familiarity.
ZCX_MEMGB
This is the amount of memory in Gb to be defined in the zCX instance. The default is 2 Gb. Knowledgeable sources in IBM tell me to “not even attempt” building an instance with less than 3 Gb, which is what I specified for the instance I built. Even with 3 Gb, performance of the image was less than brisk. This parameter is definitely one where “huge” may be adequate and “way too much” might be about right.
ZCX_HOSTDNS1 and ZCX_HOSTDNS2
The workflow provisioning process will not allow you to proceed unless at least ZCX_HOSTDNS1 is specified. I specified the ubiquitous 8.8.8.8 for the instance I built, since there is no local DNS server available on the system I used. It worked just fine with that setting even though obviously, 8.8.8.8 had no DNS host records that applied to my instance.
ZCX_GUESTIPV4
Must match the IP address specified in the TCPIP stack via the VIPARANGE DEFINE <mask> <your chosen ip address> ZCX configuration statement for your zCX instance.
So far, I have not located a reference where all the various provisioning variables along with their descriptions can be found all in one place, in any IBM documentation. The descriptions for at least a few of them seem to be scattered throughout the z/OS/2.4.0/IBM Z Content Solutions/Container Extensions section of the online documentation located here: https://www.ibm.com/docs/en/zos/2.4.0?topic=solutions-container-extensions. However, to my knowledge, a single location for usable, comprehensive, and all-inclusive reference material does not exist. I miss the days when one could rely on publications with the word “Reference” in their titles to contain complete and exhaustive reference information for all supported options and settings, and for publications with the word “Guide” in their titles to contain examples of how to use them.
Executing the provisioning workflow
Once logged in to zOSMF with an account that had the needed level of security authorizations, as talked about in the aforementioned Redbook and the zOSMF documentation, I began the process by double-clicking the “Workflows” icon on the desktop, then “Action -> Create workflow.”
In the resultant dialog window, I entered the path to the needed workflow definition file, which for the provisioning process was /usr/lpp/zcx_zos/workflows/provision.xml
I provided the path to my input variables file on the same screen.
On the next screen, there were a couple of things worth mentioning. In zOSMF, the act of creating a workflow is a separate operation from actually performing it. zOSMF does not assume that the person creating the workflow will be the same person who performs the workflow. There are two check boxes that are by default left blank. If the one labeled “Assign all steps to owner user ID” is left unchecked, then after the workflow is created, you must later go through another process of assigning the created workflow to yourself (or to someone else). Then that person must accept the assignment before any of the workflow steps can be performed. Also, notice the “Save jobs output” check box. Checking this and directing output to a directory on USS will ensure that the output of all the generated jobs will remain available even after the jobs themselves have been deleted from the JES spool. Something that I highly recommend doing.
Another other item of interest is the check box labeled “Delete workflow on completion.” If this one is left unchecked, then after the workflow has completed, it will still be visible whenever you open the “Workflows” icon. Otherwise, it will be deleted. I found that I could not, however, rerun the entire workflow, but I could select each workflow step individually, one at a time, and re-execute it more or less manually. Go figure.

Another point on the JCL generated and associated with the various workflow steps: I was tempted to try to circumvent being forced to use zOSMF by individually saving each generated JCL step into an external dataset, either a traditional zOS dataset/PDS(E) or a USS file, for later modification and reuse. Although zOSMF led me to believe this was possible (the detail panels for each step include a provision for saving the JCL externally), in practice, I found it was not possible because at least some of the steps have “JCL records” that are much longer than 80 bytes (!). Although I could save the individual JCL steps themselves, they were unusable because at least on the system I was using when I tried to subsequently submit the JCL, the long records got truncated. In other words, the operation was a success, but the patient died anyway. I’m not sure how zOSMF itself gets around this problem when it submits JCL, but it does.
Stepping through the workflow
Once the workflow had been created and assigned to yours truly, the workflow steps themselves could be started. I opened the workflow to view the individual steps and saw that the first one, “Gather IBM zCX appliance instance properties,” was marked “Ready.” Selecting “Action -> Perform” started it.
This step worked through a series of prompts to display each of the provisioning variables I had earlier stored into the provisioning input file and allowed me to view or change each one. Had I not provided an input file, this would have been the point where I would have provided each variable with a value. As mentioned earlier, the setting for ZCX_DOCKER_ADMIN_SSH_KEY is touchy and you must make sure that the full key value as generated is provided and no extra characters or carriage returns get inserted into the middle of the value. Funny how one tends to remember the things that cause pain.
After the first step completed successfully (a green check mark and the word “Complete” appears next to it in the ‘State’ column), I started the next step via “Action -> Perform” (Starts the IBM zCX appliance instance provisioning) that was now in “Ready” state. Upon starting this step, I was presented the option of having all subsequent steps run automatically, which I chose.
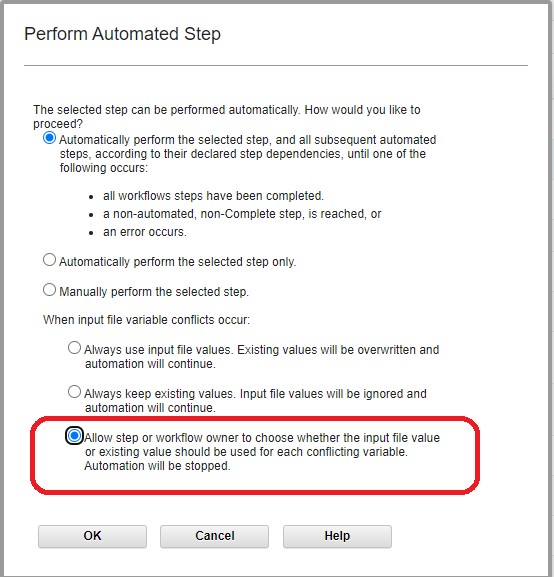
I also chose the option to allow me to choose values along the way, should there be conflicts between the input file value and the existing value, just because I’m that way.
If a step fails, as one of the VSAM space allocation steps did in my case, the workflow will stop. What happened to me was that the step that tried to allocate space for the diagnostic log files (Step 18: Allocate VSAM datasets to hold diagnostics and log data using a unique job name) failed due to insufficient available DASD space. That was when I learned that a fully empty 3390–9 is not large enough to hold even a minimal zCX configuration build.
I got around this roadblock by cheating.
- I selected the failing step and then used the “Review JCL -> Edit JCL” on the “Perform” tab to reduce the allocation to a value that I knew could be satisfied from the existing available DASD space, by altering the ‘// SET CXSIZEMB=’ JCL statement in the step that had failed, then performing it again.
- It turns out that even though the first step in the workflow, which collects all the configuration values, enforces certain limits and defaults—the size for CXSIZEMB= being one of those, which I had already set to the smallest allowable value—editing the workflow step itself allowed me to set an even smaller value in JCL without complaint. Good to know.
Starting the zCX Instance
After working through all the steps and getting them all into ‘green completed’ status, the next action was to start the zCX instance itself. Doing this was accomplished by starting an instance of the GLZ started task with JOBNAME set to the name of my zCX instance and also passing the path to the generated JSON startup file. The GLZ proc is provided in SYS1.PROCLIB with zOS 2.4. The specific command for starting the instance was provided in the results of the last step, Step 24—appropriately named “Use the provided start command to bring up the zCX appliance instance on z/OS.” The general structure of the command looks something like this:
S GLZ,JOBNAME=<zCX Instance Name>,CONF='<path to start.json file>'
After starting the instance, you should eventually see a series of messages in the JESMSGLG output for it:
GLZB027I zCX instance xxxx: Starting virtual CPUs.
GLZB001I zCX instance xxxx initialization is complete. Code date 05/06/21.
GLZB027I zCX instance xxxx: IPLing guest and starting Docker services.
GLZM004I zCX Docker services for instance xxxx are available
Interesting to note: The first few times I started the image I’d provisioned, I was sure that there was a problem because that last message, GLZM004I, never appeared. Things ‘hung’ at the GLZB017I message. I started looking for problems in whatever log files I could find but found nothing to indicate an error. Then after some time passed, the message appeared. Here’s another copy of the above messages from an actual startup, this time with the date/time stamps included:
12.25.45 STC06679 GLZB027I zCX instance xxxx: Starting virtual CPUs.
12.25.45 STC06679 GLZB001I zCX instance xxxx initialization is complete. Code date 05/06/21.
12.25.45 STC06679 GLZB027I zCX instance xxxx: IPLing guest and starting Docker services.
12.37.30 STC06679 GLZM004I zCX Docker services for instance xxxx are available.
Yes, it took about 12–15 full minutes, by the clock on my wall, for the instance to fully initialize. (Note that the above message samples are from a ‘restart,’ meaning that all the first-run initialization of all the VSAM datasets had already been performed.) Admittedly, the environment I was running on was actually a zOS 2.4 system image running under a zVM instance that hosts multiple systems, so I’m sure that has an effect, but that sure seems like a long time. I would have allocated more storage to my instance had it been available, but the zOS image under zVM that I was using for this exercise was already maxed out. Note that the storage you configure and set aside for a zCX instance is dedicated only for that instance and thus will not be available to zOS for any other use.
Readiness for connections was confirmed by these messages in the zCX instance SYSPRINT output file:
Please connect to IBM z/OS Container Extensions Docker CLI via your SSH client using port 8022
    The server is listening on: xxx.xxx.xxx.xxx


 Initial Network Interface Summary:

 Interface   State     IP Address
 ====================================================================
 enc0      UP       ¢IPv4! xxx.xxx.xxx.xxx
Attempting to connect to the zCX instance’s administrative interface proved to be quite a challenge for yours truly, probably because, as I said previously, I’m not all that familiar with navigation in the Linux world. The documentation in the Redbook suggests using this command from an OMVS shell/ssh session shell:
ssh admin@<host dns name> -p 8022
Right away, that was a problem because the zOS system where my zCX instance runs has no usable DNS name that can be obtained from any DNS server. I spent several days trying unsuccessfully to locate complete reference documentation for the ssh command that included all of its options, parameters, etc. along with descriptions of each, trying various combinations of parameters to get connected, but nothing worked. Finally, with outside help, I stumbled onto the command and parameters that allowed me to connect. The admittedly simple command that finally worked was:
ssh admin@<IP address> -i <key file> -p 8022
Where:
- “admin” was the user ID specified for the variable ZCX_DOCKER_ADMIN.
- “<IP address>” was the virtual IP address of the zCX image set in variable ZCX_GUESTIPV4.
- “-i <key file>” was the full path to the private key file that was generated from the ssh-keygen command. It must be the file that is paired with the public key that ssh-keygen generated and specified in the provisioning process for the variable (ZCX_DOCKER_ADMIN_SSH_KEY).
- “-p 8022” identifies the port that the Docker engine listens on for connections. Interestingly, this port is apparently hard-coded inside the zCX appliance and cannot be changed.
At this point, I was able to access the instance’s administrative interface and perform operations on Docker, including successfully pulling an image from hub.docker.com for Portainer (a web-based GUI Docker management tool) and using it to create a running and functional container that I could access via a web browser and use to manage the Docker engine running in my zCX instance. Huzzah!
Commands executed in the administrative interface to get this done:
docker pull portainer-ceDownloads the portainer-ce image from Docker hubdocker run -d --name portainer -p 9000:9000 --restart always -v /var/run/docker.sock:/var/run/docker.sock:ro portainer/portainer-ce
Creates a container [run], That will run “disconnected” in the background [-d], Named ‘portainer’ [–name portainer], Maps internal port 9000 to “public” port 9000 via Docker’s virtual bridge [-p 9000:9000], Sets the container to be restarted automatically whenever the Docker engine starts [–restart always], links internal file /var/run/docker.sock onto external file /var/run/docker.sock in read-only mode [-v /var/run/docker.sock:/var/run/docker.sock:ro], and builds the container from the image [portainer/portainer-ce]
Observations and issues
What follows is a series of observations and issues I encountered while working with zCX and its associated zOSMF workflows.
In addition to the provisioning workflow in /usr/lpp/zcx_zos/workflows/provision.xml, there are other workflows located in that same directory, some of which are:
| Workflow | Description |
| backup_config.xml | Backup configuration for a zCX instance |
| deprovision.xml | Deprovision/delete a zCX instance |
| reconfigure.xml | Alter/update configuration for a zCX instance |
| restore_config.xml | Restore zCX instance configuration from backup |
Details
backup_config.xml
Makes a single version backup of the contents of the <instance name>/config directory that is by default located in /global/zcx/instances.
The backup is written to /global/xcz/instances/<instance name>/config.bkup.
- There is no provision for maintaining more than one backup version. Only the current settings are copied and will overlay any previous backup.
- Only the contents of ../<instance name>/config are copied. None of the VSAM files (some of which appear to also contain configuration information) are backed up nor are any of the log files, also on VSAM.
- So, as of this writing, accomplishing a comprehensive backup complete with support for multiple backup versions will require building your own custom process.
restore_config.xml
The same concerns that apply to backup_config.xml also apply to restore_config.xml.
reconfigure.xml
I used this workflow definition multiple times to reconfigure my zCX instance while struggling to arrive at the correct settings, options, and usage of the required public/private key pair for accessing the administrative interface. On several occasions, after using it to change these two values and only these two values (ZCX_DOCKER_ADMIN and ZCX_DOCKER_ADMIN_SSH_KEY), I found that the zCX instance itself would no longer fully initialize and begin listening on the administrative port, even after waiting for more than an hour. Each time that happened, I ended up having to completely deprovision the instance using deprovision.xml and rebuild it from scratch. Let the user beware.
Various GOTCHAs:
- GOTCHA #1: The startup configuration file for the instance, which is a JSON file, and will be stored in an instance-specific directory under the one specified in the value for provisioning variable ZCX_REGISTRY_DIR, will in fact be created inside a new filesystem that will likewise be created during the provisioning process and will be mounted in Step 3.18 “Allocate and Mount zFS using the default job name.” However, there is nothing in the workflow that will harden this mount so that it will survive a Sysplex IPL. This caused me much pain and gnashing of teeth because I thought that some nefarious person or process was periodically deleting the aforementioned JSON file. The first few times I found the file missing, I didn’t realize it was because the mount had been dropped after an IPL. The need to harden this mount so that it will survive such an IPL is not documented anywhere, to my knowledge.
- GOTCHA #2: After making manual changes to the JCL as described above in order to effect corrections, on the next panel, the “Finish” button to submit the JCL would sometimes be grayed out and non-functional. I eventually figured out that fiddling with the “Submit JCL” and “Save JCL” check boxes near the upper left corner of that panel—alternately checking and unchecking them—would usually enable the “Finish” button so that I could submit the job.
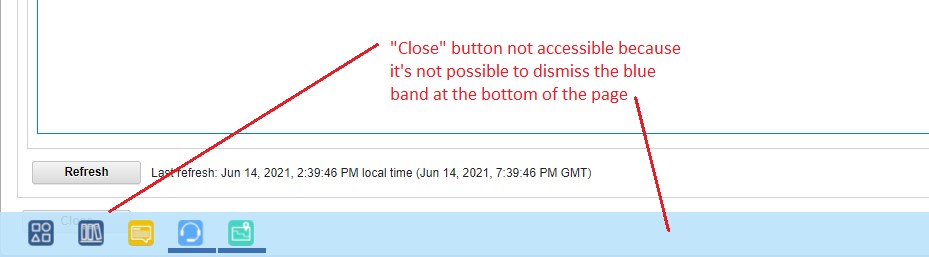
- GOTCHA #3: Sometimes the screen layout and behavior of zOSMF itself made accessing various buttons on the screen impossible due to them being hidden behind the blue band at the bottom of the desktop, and being unable to dismiss it. Witness:
There were probably GOTCHA’s that I’ve forgotten, but these are the significant ones that I remember as having caused me some level of grief.
Final Thoughts
It’s my hope that my recounting of how I, as an aged Systems Programmer, managed to get zCX working on zOS 2.4 and at least partially usable will be of use to those who embark on the same journey. We’re all in this together.
– Nowhere in the article (that I can see) did you state how long this entire process took?
– Is all of this necessary for each and every zCX instance you set up?
– Did you ever get an explanation from IBM as to why it took so bloody long to start the container environment?
How does the container respond to requests after it has been deployed in zCX?
1) I didn’t attempt to apply a stopwatch to how long it took me because I did have some “learning curve” to master that wasn’t directly related to zCX, so I didn’t think it would be “fair” to include what was on my part the time it took to get all that done. That mostly consisted of getting zOSMF configured correctly with all optional services that are required for zCX configured and working properly. Then there was the problem I had with SSH, which I attributed mostly to my lack of experience with it. Start to finish took me about a week, but that included my learning curve time.
2) Once all the zOSMF features are present including the needed security configuration, that should reduce significantly the time required to get one running. At that point it will become a matter of preparing the input configuration file, running the workflow, and starting it up.
3) My internal IBM contact says that storage allocation is supremely important and the idea that you can create a usable environment in 2 Gb or even 3 Gb is pure fantasy. 3Gb was the largest allocation I could give it in my test environment, then also I was running zOS under zVM which I’m sure imposed an additional performance impediment. Once it was up and running, response using the one container I created (Portainer) was reasonable.
zCX uses the SIE instruction so if you are running it under z/VM which also uses SIE in an LPAR in which PR/SM also uses SIE then you’ve exhausted the hardware assists and z/VM has to emulate it which will slow things down. That you’re getting reasonable performance is a testiment to the hardware and operating systems. Trying to run it on a zPDT under z/VM wasn’t as successful.